> ## Documentation Index
> Fetch the complete documentation index at: https://koreai-content-gov.mintlify.site/llms.txt
> Use this file to discover all available pages before exploring further.
# Adding the Google Chat Channel
[Back to Available Channels](/ai-for-service/channels/adding-channels-to-your-bot#available-channels)
Adding Google Chat as a channel to your AI Agent allows end-users to chat with it using Google Chat. This article shows you how to set it up.
## Step 1: Enable the Google Chat API
1. Log into [Google Cloud.](https://console.developers.google.com/projectselector2/apis/dashboard?pli=1)
2. Click **Library**, in the left side menu.
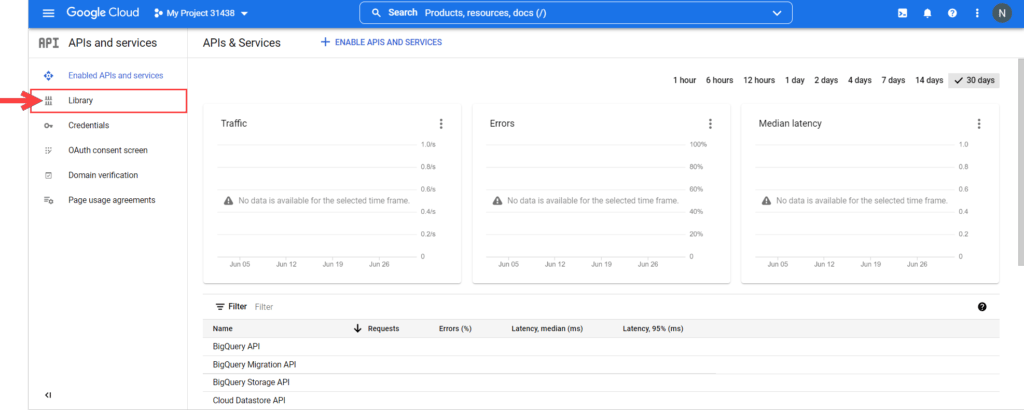 3. Search and select the **Google Chat API**.
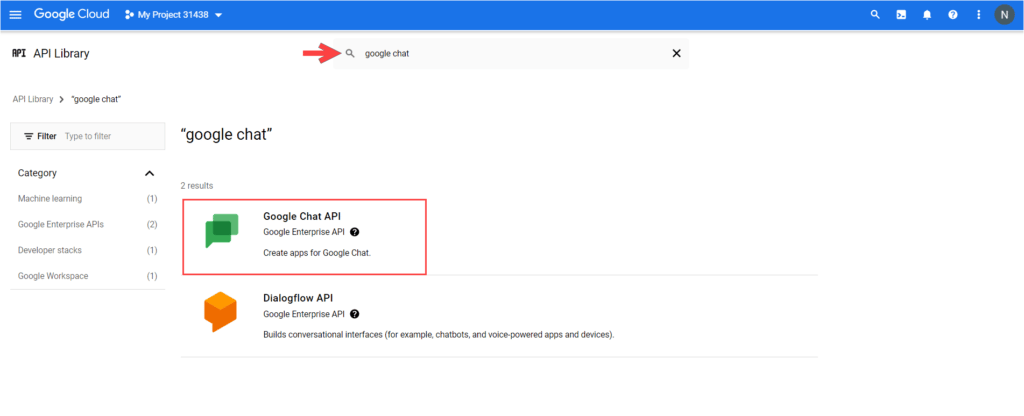 4. Click **Enable**.
5. On enabling the API, you are redirected to the **Overview** page of the **Google Chat API**.
4. Click **Enable**.
5. On enabling the API, you are redirected to the **Overview** page of the **Google Chat API**.
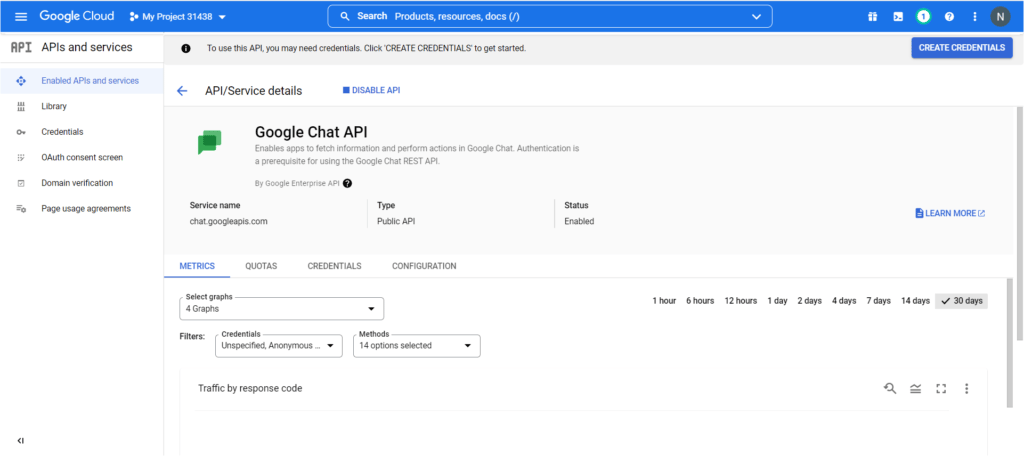 ## Step 2: Set Up the API in Google Cloud
To set up the Google Chat API, you need to create credentials first, then configure its details and functionality, as follows:
1. From the Credentials page, click **Create credentials** and select **Service account**.
## Step 2: Set Up the API in Google Cloud
To set up the Google Chat API, you need to create credentials first, then configure its details and functionality, as follows:
1. From the Credentials page, click **Create credentials** and select **Service account**.
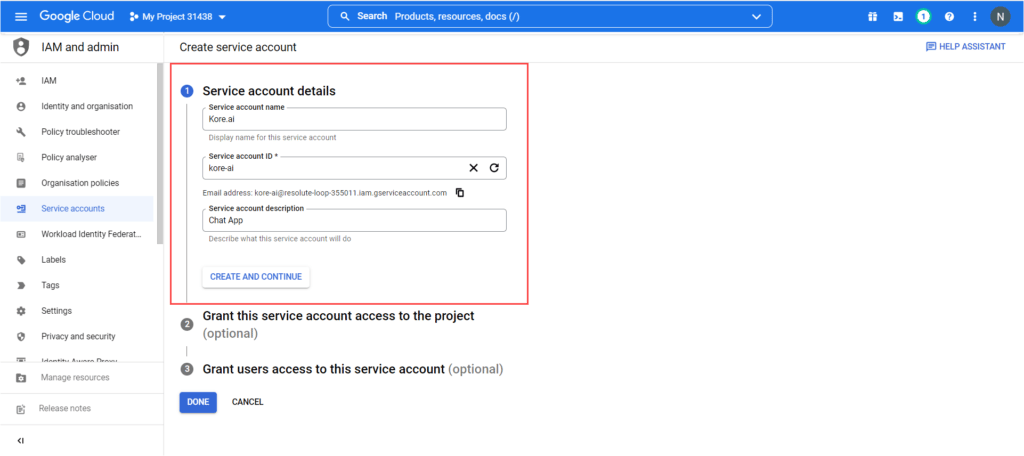
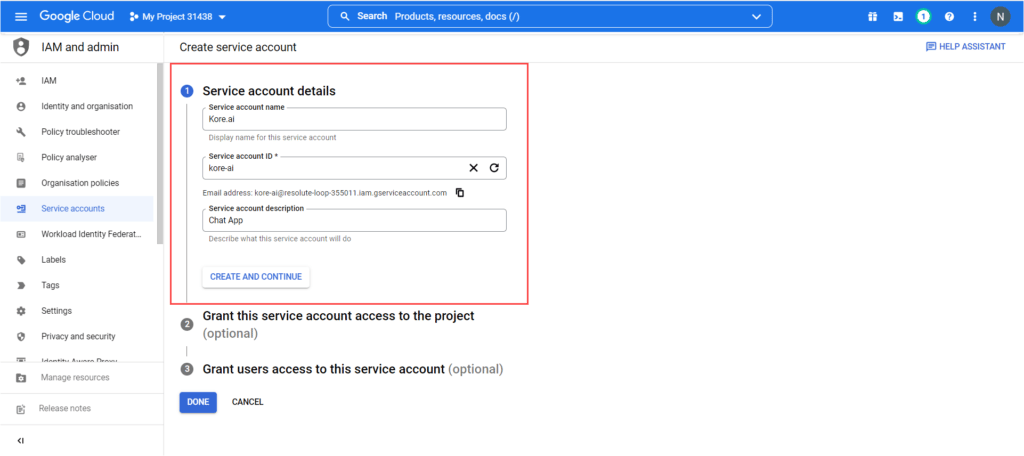 2. Provide a name for your service account, service account description, and click **Create and Continue**.
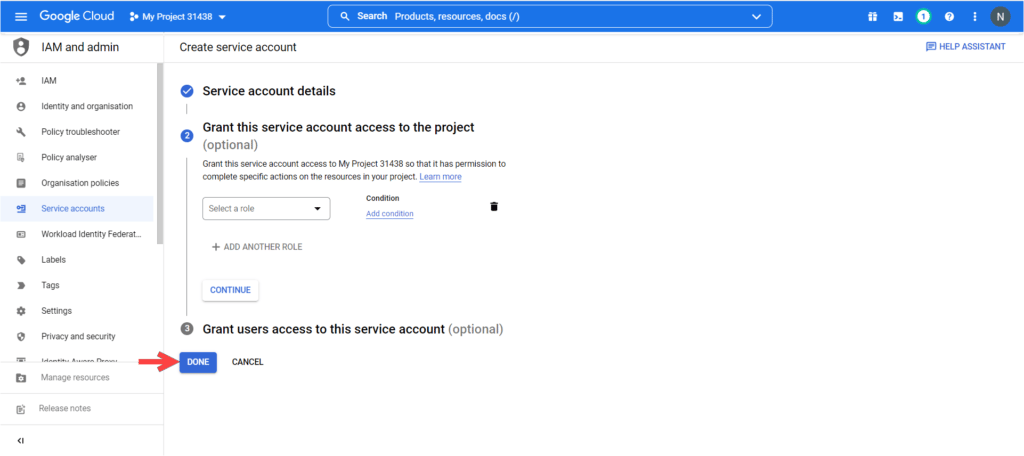
 3. Once the service account is created there are 2 optional steps:
* Grant this service account access to project
* Grant users access to this service account
4. Click on the **Done** button.
3. Once the service account is created there are 2 optional steps:
* Grant this service account access to project
* Grant users access to this service account
4. Click on the **Done** button.
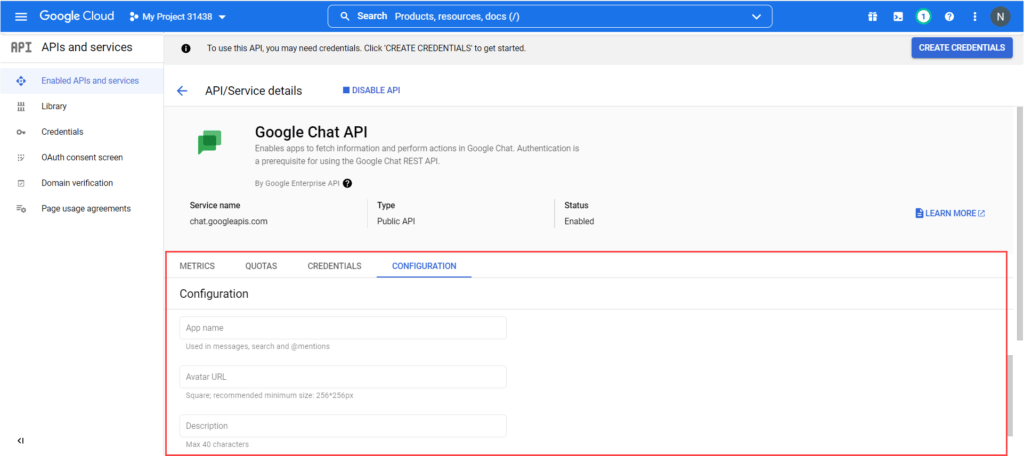
 5. Go to the **Configurations** section and provide all the required details like:
* App name
* Avatar URL
* Description
5. Go to the **Configurations** section and provide all the required details like:
* App name
* Avatar URL
* Description
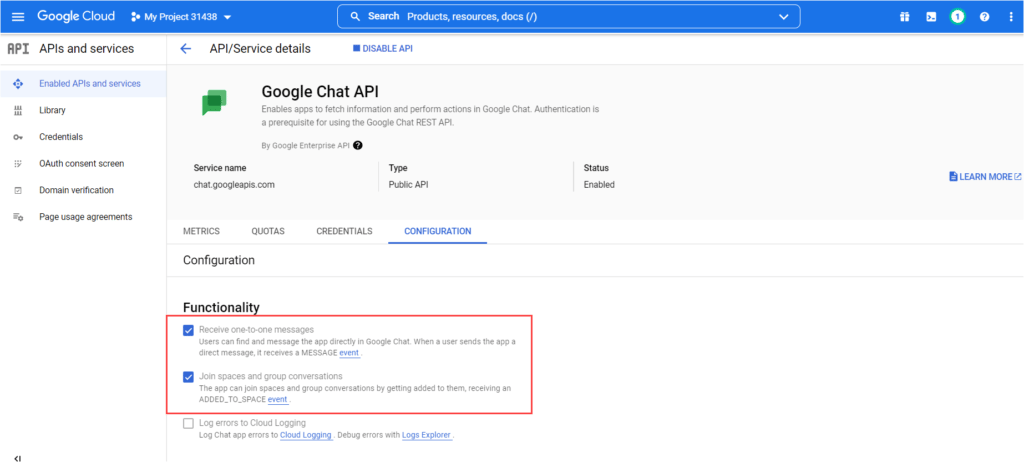
 6. Under **Functionality** choose both **Receive one-to-one messages** and **Join spaces and group conversations** options.
 7. Under **Connection Settings**:
* Select the **App URL** option.
* Go to the Kore.ai **Channels & Flows** > **Channels** > **Digital** > **All** > **Google Chat** > **Configurations** and copy the **Webhook URL**.
* Go back to **Connections Settings in Google Cloud** and paste the Webhook URL
8. Select the appropriate option under **Permissions**.
7. Under **Connection Settings**:
* Select the **App URL** option.
* Go to the Kore.ai **Channels & Flows** > **Channels** > **Digital** > **All** > **Google Chat** > **Configurations** and copy the **Webhook URL**.
* Go back to **Connections Settings in Google Cloud** and paste the Webhook URL
8. Select the appropriate option under **Permissions**.
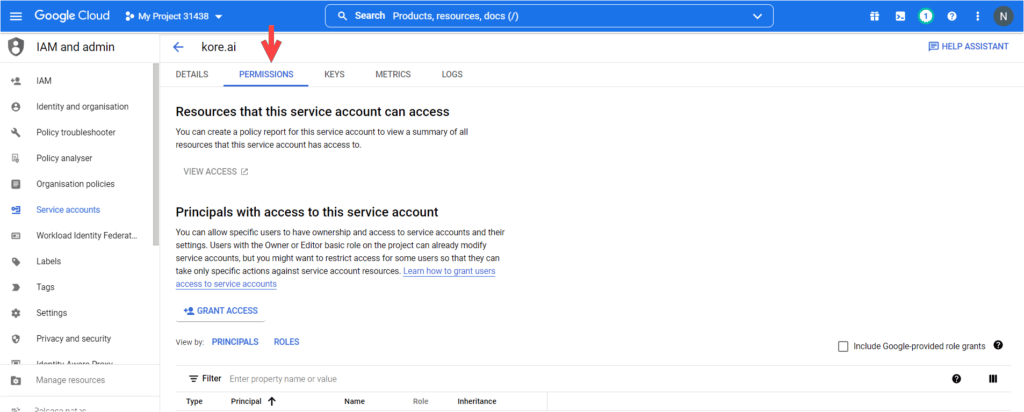 Next, we will be configuring the API keys that the Platform will use to connect to Google Chat.
## Step 3: Create API Keys
Once your service account has been created, you need to manage the keys corresponding to your API, as follows:
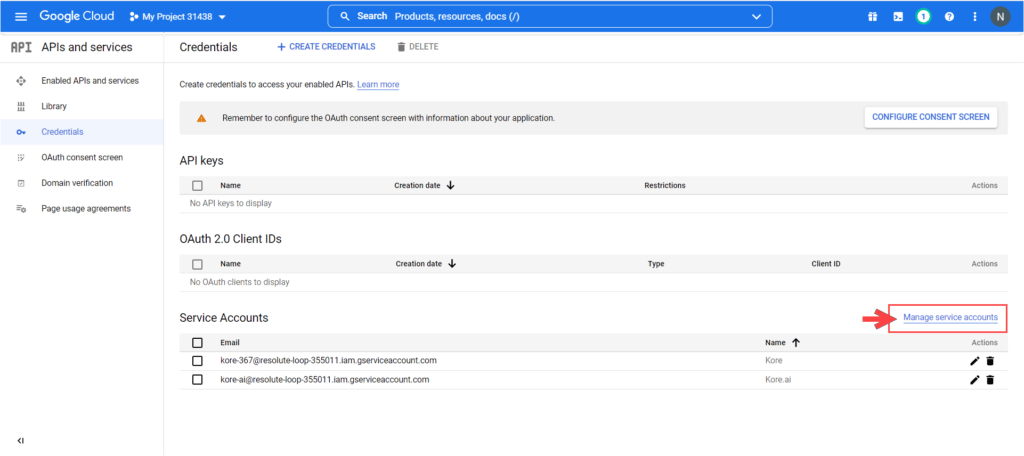
1. Navigate to the **Credentials** page and click on **Manage service accounts**.
Next, we will be configuring the API keys that the Platform will use to connect to Google Chat.
## Step 3: Create API Keys
Once your service account has been created, you need to manage the keys corresponding to your API, as follows:
1. Navigate to the **Credentials** page and click on **Manage service accounts**.
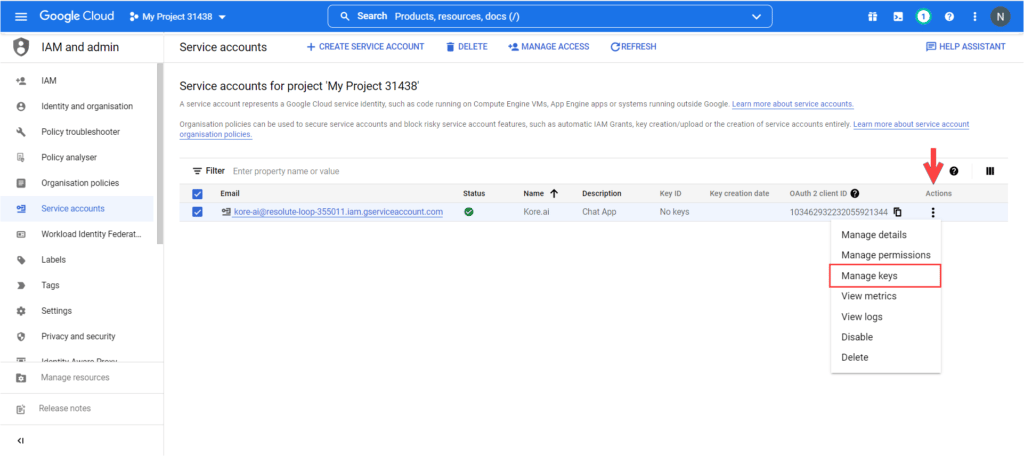
 2. From the Manage service accounts page click the **Actions** button corresponding to your newly created account, then on **Manage keys**.
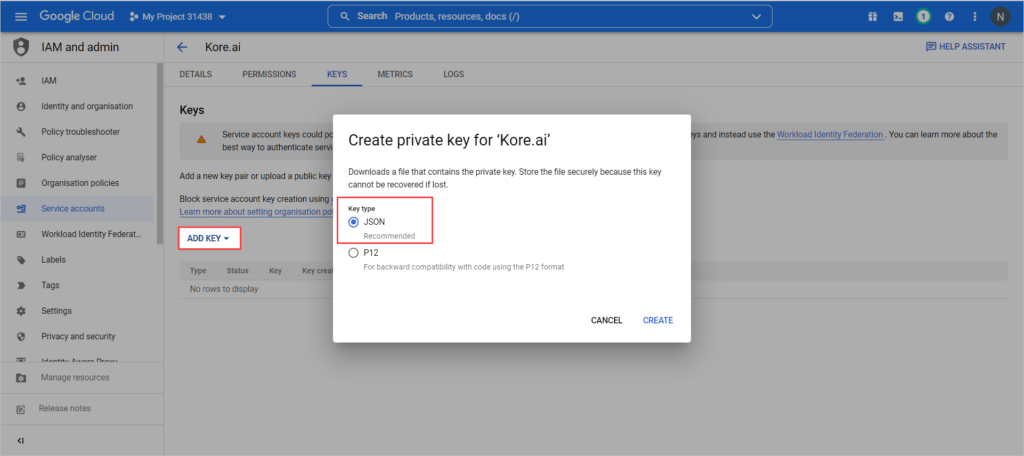
 3. From the **Manage Keys** page click on **Add Key** button, select **Create new key** from the drop down, select the JSON option, and click on **Create** button.
 A JSON file will be generated and you need to copy the **client\_email**, and **private\_key** that needs to be input into the Platform. .
## Step 4: Configure the Google Chat Channel
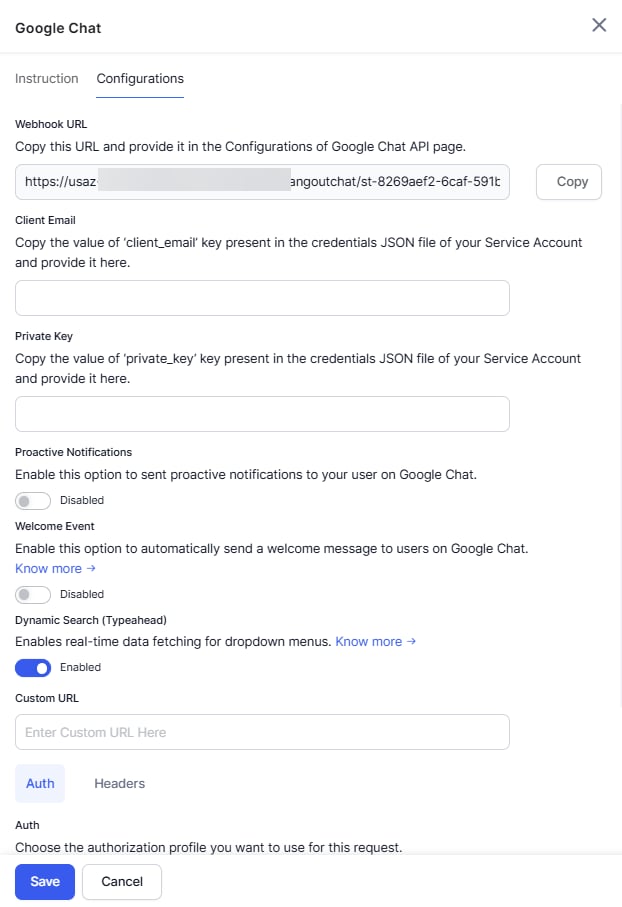
In the Platform, select the AI Agent you’re working with, then go to **Channels & Flows** > **Channels** > **Digital** > **All** > **Google Chat** > **Configurations**.
1. Enter the following configuration details:
1. **Client Email** - Copy the value of the **client\_email** field present in the credentials JSON file of your Service Account and enter it here.
2. **Private Key** - Copy the value of the **private\_key** field present in the credentials JSON file of your Service Account and enter it here.
2. Enable **Proactive Notifications** to send relevant updates to the users without requiring them to initiate interaction with the app first.
3. Enable the **Welcome Event** toggle to automatically send a welcome message and initiate start (experience) flows when users install an app(bot) integrated with Google Chat via Google Workspace.
4. (Optional) Enable **Dynamic Search (Typeahead)** to provide relevant, real-time suggestions from external systems as users type. Specify the custom URL and configure authentication. The platform forwards the search term to the configured endpoint and displays the returned suggestions.
5. Select **Yes** and select **Save** to enable Google Chat channel.
A JSON file will be generated and you need to copy the **client\_email**, and **private\_key** that needs to be input into the Platform. .
## Step 4: Configure the Google Chat Channel
In the Platform, select the AI Agent you’re working with, then go to **Channels & Flows** > **Channels** > **Digital** > **All** > **Google Chat** > **Configurations**.
1. Enter the following configuration details:
1. **Client Email** - Copy the value of the **client\_email** field present in the credentials JSON file of your Service Account and enter it here.
2. **Private Key** - Copy the value of the **private\_key** field present in the credentials JSON file of your Service Account and enter it here.
2. Enable **Proactive Notifications** to send relevant updates to the users without requiring them to initiate interaction with the app first.
3. Enable the **Welcome Event** toggle to automatically send a welcome message and initiate start (experience) flows when users install an app(bot) integrated with Google Chat via Google Workspace.
4. (Optional) Enable **Dynamic Search (Typeahead)** to provide relevant, real-time suggestions from external systems as users type. Specify the custom URL and configure authentication. The platform forwards the search term to the configured endpoint and displays the returned suggestions.
5. Select **Yes** and select **Save** to enable Google Chat channel.
 After enabling the channel and verifying all the configurations, you can optionally publish the app for the new channel. Learn more about [Publishing your App](/ai-for-service/deployment/publishing-app).